1 + 1RStudio and Scripting
RStudio Interface
To get started on a tour, open R studio, click File and select new File + R script . This should open up the fourth panel that we can now take a look at, and will look something like Figure 1
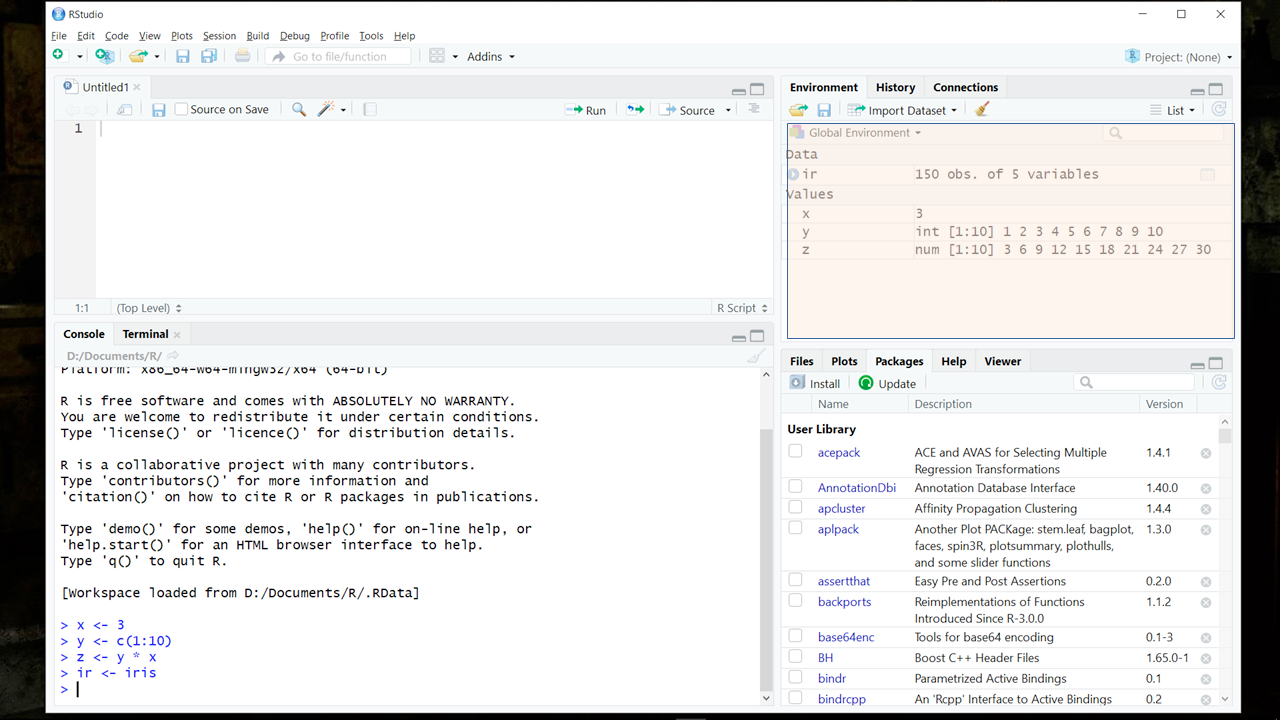
RStudio’s interface is divided into four main panes:
Script Editor (top-left): Here you’ll write and edit your R scripts. It’s essentially a text editor designed for R code.
Console (bottom-left): The Console is where you can type R commands and see immediate results. It’s useful for quick calculations or testing small code snippets.
Environment (top-right): This pane shows all the variables, data frames, and functions you’ve created in your current R session. Think of it as an inventory of your workspace.
-
Utility Pane (bottom-right): This multi-purpose area includes several tabs:
- Files: For navigating your computer’s file system
- Plots: Where your graphs and visualizations appear
- Packages: For managing R packages
- Help: Access R’s built-in documentation
- Viewer: For viewing local web content
Tip
you can customize your R studio layout to suit your needs. That is why mine looks different. To change your layout, go to Tools > Global Options > Pane Layout.
The Console
The console in RStudio is where you can directly interact with R. It’s marked by the > prompt, indicating R is ready for your input.
Execution in Console
When you type a command and press Enter, R executes it immediately:
The output appears directly below:
[1] 2Errors in Console
If you make a mistake, R will show an error message:
1 + aError in eval(expr, envir, enclos): object 'a' not foundThis error occurs because a isn’t defined.
Scripting
For more complex operations, you will need to use the script editor. To quote Alston and Rick (2021)
“When possible, all data wrangling and analysis should be performed using coding scripts—as opposed to using interactive or point-and-click tools—so that every step is documented and repeatable by yourself and others. Code both performs operations on data and serves as a log of analytical activities. Because of this second function, code (unlike point-and-click programs) is inherently reproducible. Most errors are unintentional mistakes made during data wrangling or analysis, so having a record of these steps ensures that analyses can be checked for errors and are repeatable on future data sets. If operations are not possible to script, then they should be well-documented in a log file that is kept in the appropriate directory.”
Creating and Writing a New Script
To run code from your script:
For a single line: Place your cursor on the line and press Ctrl+Enter (Windows/Linux) or Cmd+Enter (Mac).
For multiple lines: Highlight the lines and press Ctrl+Enter (Windows/Linux) or Cmd+Enter (Mac).
To save your script:
Click
File>Save AsorSaveChoose a location and name for your file. R script files end with
.R
Commenting in Scripts
Use # to add comments in your scripts:
# This comment explains the next line, which multiplies 10 by 5
10 * 5
[1] 50Your Scripts Are Your Source of Truth
In data science and programming, your scripts should serve as your “source of truth” - the authoritative record of your work. This principle is crucial for several reasons. Firstly, it ensures reproducibility: anyone can run your script and obtain the same results, which is fundamental for scientific integrity and collaboration. Secondly, it provides traceability, allowing you to track every step of your process and easily identify or fix errors. Remember, if you can’t reproduce your results from your scripts alone, you’re missing a crucial part of your analytical process.
Practice Script
Here’s a basic script:
# Console and Basic Scripting Practice

# Try running these commands one at a time:

# In the console:
2 + 3

# In a script:

# Perform a calculation
c <- a * b # we will learn more about the <- in the next section
print(c) # Print the result

# Try these in your script:
# 1. Create a new variable and assign it a value
# 2. Perform a calculation with your new variable
# 3. Add a comment explaining what your code does
# 4. Run your script and check the output in the console
Alston, Jesse M., and Jessica A. Rick. 2021. “A Beginner’s Guide to Conducting Reproducible Research.” The Bulletin of the Ecological Society of America 102 (2). https://doi.org/10.1002/bes2.1801.